 28.10.2006, 18:22
|
#1 |
|
Участник
|
Axapta Lessons: Using X++ Code during Data Import
Источник: http://axapta-lessons-learned.blogsp...import_14.html
============== The developer's guide gives us an example of how we can use X++ code during Data Import. The next explanation is taken from the developer's guide: "The Conversion tab offers the possibility to manipulate individual records through X++ code before they are inserted. The code on the Conversion tab is executed when all fields have been read from the file and placed in the buffer but before the buffer is inserted in the table." An example of the X++ code is given in the developer's guide. However the example does not completely explain the set up of the import definition and does not cover the use of conversion rules for fields. Hereafter we are going to have a look at how X++ code can be used in an import definition. To demonstrate how it works we are going to create an import definition for a file containing ZipCodes. -- I hear you thinking, there already is a standard function for importing ZipCodes. Yes, there is one on the form Postal (Zip) codes. Using this function we can process a file that contains updates on our ZipCode records. Each line (record) in the file identifies an action which will be executed when processing the line. Zipcodes can be added, deleted or updated during import. But before we can use this import function the zipcodes will have to be available in the table ZipCodes. The input file contains only the updates. -- Here is an extract (excell format) of the input file I am going to use:  Now what can we learn from the file layout: 1. There is a header record, containing the column/field names. Obviously we do not want to import the header record. It is there for identification of the columns. 2. Assume the standard ZipCode format is 9999XX. Notice the ZipCode is stored in two columns: ZipCodeNumbers and ZipCodeLetters. We will have to concatenate these during import. 3. The column EvenOdd corresponds to the field EvenOdd in the table ZipCode. The field EvenOdd indicates whether the postal code applies to all houses on a street, to even numbered houses, or to odd numbered houses. The field is based on the Base Enum AllEvenOdd.  The elements have the following EnumValue: All (0), Even (1) and Odd (2) In our input file the column EvenOdd contains the values A (Odd), B (Even) and C (All). Thus we will have to map these values to the corresponding enum value in the database. Let us start creating the import definition group. Step 1: Find the Data export/import node and open the form Definition groups. We can find the Definition groups under Administration, Periodic, Data export/import.  The form Definition groups shows us all definition groups available in Axapta. Normally when you have not used definition groups the form will be empty. Step 2: Create a new definition group and select the type Custom. Select File, New from the Toolbar menu or press Ctrl+N. The form for creating a table definition group opens. We are going to name our definition group "ZipCode-A".  The Type Custom is the option for importing flat files (comma separated or fixed position). In the next steps we are going to define the details of the definition group. These include: - the tables for which we are creating the definition group - which field separator should be used - how to convert values in the import file - what criteria should be applied to accecpt or reject records - where the log files are located - where the import is located - which conversion rules should be applied on individual fields But first some technical information. The Import program will read and process the lines in the input file one by one. See how the input file looks in CSV format.  When a line is read first the fields will be retrieved from the line and thereafter conversion or criteria rules will be applied. If all goes well a record will be added to the table defined in the defintion group. Step 3: Add a table to the definition group in the Overview Tab. Select your newly created definition group from the list of groups and click the button Table setup. Open the dropdown list for the available tables and select the table ZipCode.  Set the status field to Delete and Import, we are initially filling the table and are going to delete all available records before importing. Next specify the name of the input file. You can look up the file when you click the lookup button. Step 4: Specify the Field separator in the General Tab The field separator for our CSV-file will be ";".  Step 5: Specify the Conversion rules in the Conversion Tab: Remember that the standard ZipCode format is 9999XX and our input file contains two columns: ZipCodeNumbers and ZipCodeLetters. These two columns will be in two fields separated using ; in each line. In the Conversion Tab we will be able to concatenate the two fields and store the result in the field ZipCode.  Technically the rules defined in the Conversion tab are applied after the fields have been retrieved from the input file. That is why we can store the concatenated value in the field ZipCode. Step 6: Specify the Criteria for accepting or rejecting lines in the file: 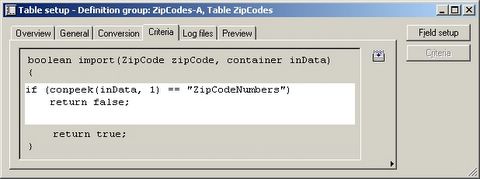 Herewith we can prevent the header record is stored in the tabel. Step 7: Specify the Fields: Now we can map the fields in the line to the appropriate fields in the table. The fields in the table are given with their field name and we have to indicate for each field the position in the imported line. We also have to indicate which of the fields are to be imported. This is done using the Active field.  For the ZipCode field we may leave the Position field empty and the Active field deselected. The field will be filled by the X++ code in the Tab Conversio. Alright we are ready with defining the ZipCode Import Definition group. It is time to test whether it works. For that purpose ensure you have the input file ready in the specified directory and open the form Definition groups.  Now it is up to you! Select the ZipCode definition group and click the button Import. [End of Lesson] ============== Источник: http://axapta-lessons-learned.blogsp...import_14.html |
|
|


 Линейный вид

