 05.11.2015, 00:12
|
#1 |
|
Участник
|
atinkerersnotebook: New Vendor Onboarding Within Dynamics AX 2012
Источник: http://atinkerersnotebook.com/2015/1...amics-ax-2012/
============== Built into Dynamics AX is a feature for managing the setup of new Vendors which allows users to request for new vendors to be added, for the purchasing group approval process by the way of workflows, and finally automatically create new vendor records. This process is a great way to streamline the vendor setup process and is also a time saver because people are involved through the workflow process and all activities are tracked. In this walkthrough we will show how the vendor on-boarding process is handled through the Vendor Requests function within Dynamics AX. Requesting A New Vendor The first step in the process it to submit a request for a new vendor to be added to Dynamics AX. You can do this two ways. The first is through the Employee Self Service portal, and the second is to request the vendor to be set up through the Procurement and Sourcing module within the Dynamics AX client itself. How to Do It… To request a new vendor to be set up in the system through the Employee Self Service portal, just click on the Vendor Requests menu item within the Order Products group. 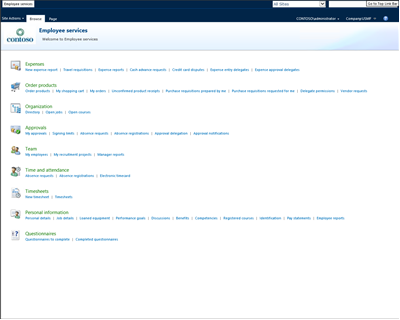 To request a vendor to be set up through the Dynamics AX client, click on the Unsolicited Vendors menu item within the Vendor Requests folder of the Common group of the Procurement and Sourcing area page. When the Unsolicited Vendors maintenance form is displayed, click on the Request Prospective Vendor button in the menu bar. 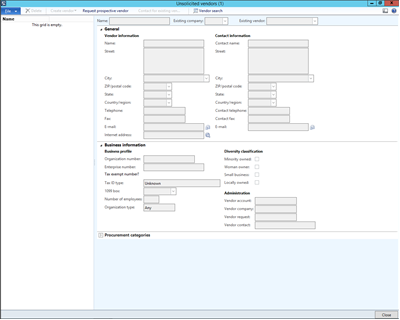 This will open up the Employee Services portal and take you to the Vendor Requests form. All you need to do is click on the Vendor Request button within the New group of the Requests ribbon bar. 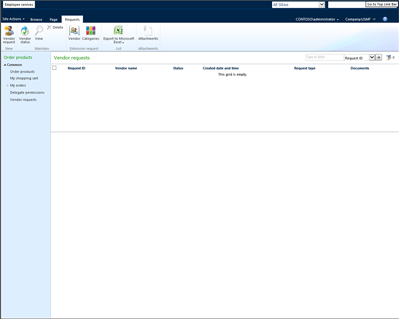 This will open up a New Vendor Request dialog box. Enter in the Vendor Name, and the First Name and Last Name of the contact that you have for the vendor. When you have done that, click on the Create button.  This will take you to the Edit Vendor Request where you can enter in a little more information for the vendor. 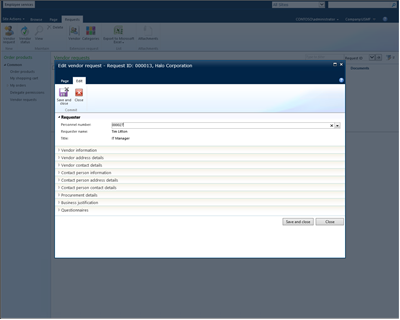 Entering the Contact Information for the Prospective Vendor Once you have initiated the new vendor request there is a little bit of information that you need to add to the record to help the procurement group find out more information about the Vendor. To start off with you will want to add the address and contact information for the vendor. How to Do It… To do this, return to the Edit Vendor Request form and if you like you can maximize the form so that you can see a little more of the information associated with the Vendor and then expand out the Vendor Address Details, and the Vendor Contact Details. Now we will need to add an address for the vendor. To do this click on the Add button in the Vendor Address Details tab. This will open up the Add Address dialog box. Enter in the vendors primary address details and then click on the Save and Close button. 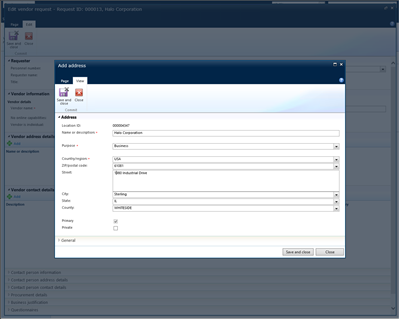 Now you have an address for the prospective vendor. If you want to add additional contact like the main phone number for the vendor, click on the Add button within the Vendor Contact Details tab. This will add a new record within the Vendor Contact Details table form. All you need to do is enter in the Description, set the Type to Phone, enter the phone number into the Contact Number/Address field, set the Primary flag, and then click on the Save icon. Now we have a primary phone number recorded against the new vendor record. 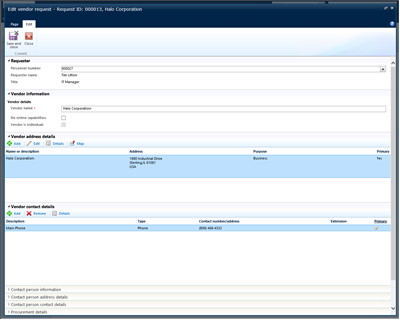 Entering the Contact Information for the Vendor Person Contact Once you have the main contact information set up you will also need to specify the primary person contact details for the vendor, including their e-mail address so that they can be notified by the system as they are being set up. How to Do It… To do this expand the Contact Person Information, Contact Person Address Details, and Contact Person Contact Details tabs within the Edit Vendor Request form. You will see that the address information has already be defaulted in based off the default address of the Vendor that you just entered. We need to enter in an e-mail address for the Contact Person though so that we can send them welcome e-mails. To do this, click on the Add button within the Contact Person Contact Details tab. All you need to do is enter in the Description, set the Type to E-mail Address, enter the email address into the Contact Number/Address field, set the Primary flag, and then click on the Save icon. Now we have configured the Contact Person details. 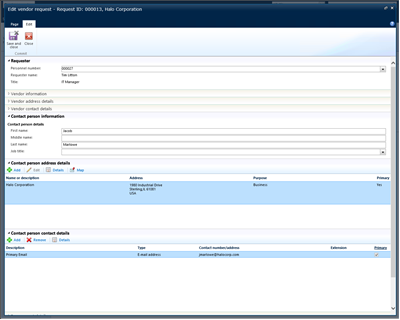 Specify the Default Procurement Categories Also, based on the Procurement Policies we may need to also specify some default Procurement Categories that the vendor will be supplying us with goods and services with. This will help in classifying the vendor and also help procurement approve the classifications. How to Do It… To do this expand out the Procurement Details tab and you will see that all of the default Procurement Categories are shown within a tree view. Select all of the categories that you want to invite the vendor to participate in. 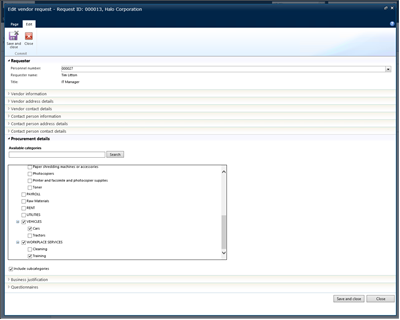 Enter the Business Justification for the Vendor Finally, we may also need to justify the vendor setup with a set of required questions such as why we need the vendor to be set up, have we looked at other vendors, are they a bid only vendor and more. How to Do It… To do this open up the Business Justification tab group. You will see that there are a number of questions that you can answer about the vendor. Based on the Procurement policies some of these will be required. In this example, all we need to do is specify the Nature of Activity and Justification. After you have done that you can just click on the Save and Close button to update the information. 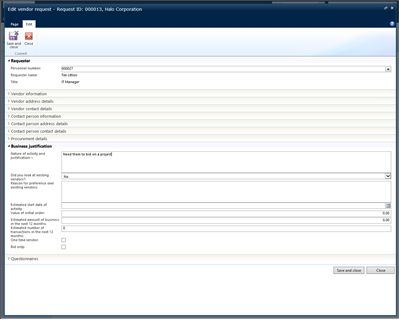 Submit the Prospective Vendor for Approval The strength of this process is the ability to have these approvals routed through workflows to the appropriate people. There are a couple of workflows that will be initiated by this process and the first is to have the prospective vendor approved by the purchasing department as a one that we will want to continue with. This is not approving the vendor and setting it up through – just allowing it to continue on. How to Do It… To submit the vendor for approval just click on the Submit button beneath the ribbon bar which is now enabled. 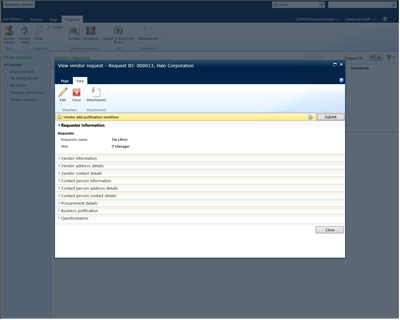 This will open up a Vendor Add Justification Workflow comment box. If you want to add any additional information then you can enter it into the comments and then click on the Submit button. 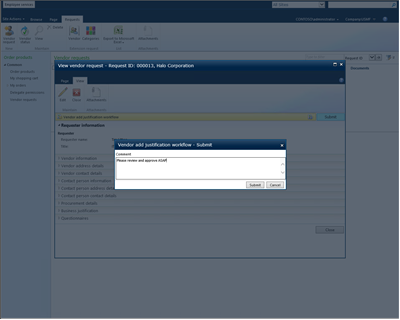 After you have done that you can close out of the Employee Services portal. The Vendor Justification Workflow This workflow is managed through the Vendor Justification workflow template and we can make this as simple or elaborate as we like. How to Do It… To view the workflow, click on the Procurement and Sourcing Workflows menu item within the Setup group of the Procurement and Sourcing area page. When the Procurement and Sourcing Workflows list page is displayed, double-click on the Vendor Add Justification Workflow item in the list. This will open up the workflow that is being used for the Vendor Justification approval , which just has a single approval step. 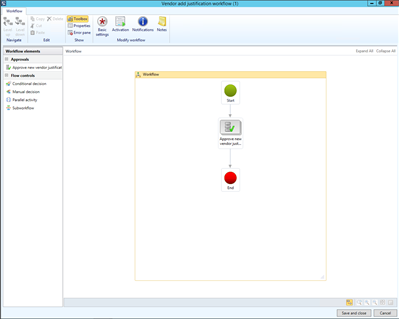 Approving the Vendor Justification Once the approval workflow is submitted then it will be routed to the appropriate approvers for approval. How to Do It… To see this in action open up the Notification List and you will see that you have been assigned a new approval task. Select it and then click on the Go To Origin button within the menu bar. 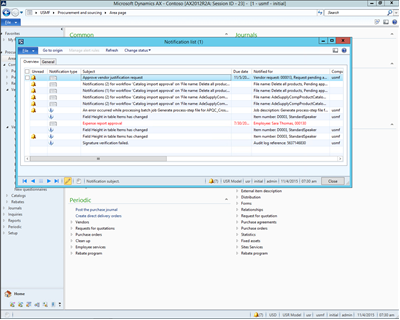 This will take you to the New Vendor Request with all of the information that was entered through the Vendor Request in the employee portal. If everything looks good then click on the Actions button within the Workflow bar and select the Approve option. 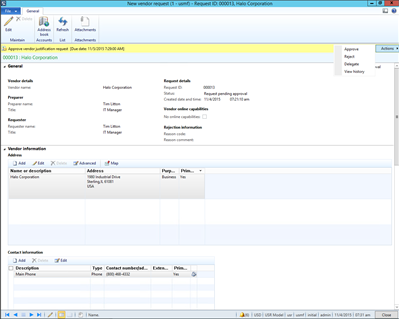 This will open up a new comment box for the Approval step. If you want to add any additional comments then just enter them into the Comment field and then click on the Approve button. 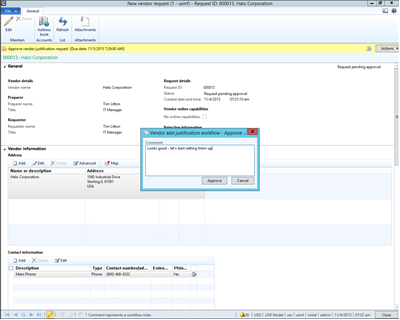 Viewing the Workflow History The workflows are all audited within the system and if we want we can view all of the approvals and comments through the workflow history. How to Do It… To do this click on the Actions button and select the View History button. This will show you all of the workflow steps that have been performed. 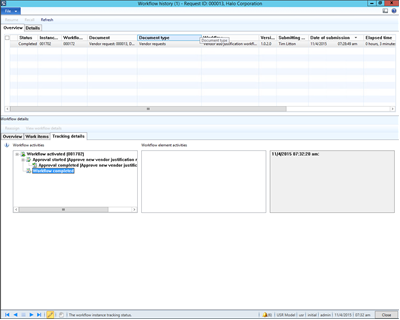 Viewing the Status of the Vendor Requests There may be multiple vendors that are being set up at any one time, so being able to see all of the prospective vendors and also their status within the setup process is a good thing to be able to do. How to Do It… To do this, click on the Vendor Profile Pending Approval menu item within the Vendor Requests folder of the Common group within the Procurement and Sourcing area page. This will open up a list of Vendors that are pending approval and you will see the new vendor that you just requested is on the list and is also in a status of Request Rending Complete.  Provisioning the Vendor User Account If the vendor is going to have on-line access through the Vendor Self Service Portal then they will need to have a username within Dynamics AX. You don’t have to do this by hand through because there is a feature within the vendor on-boarding process that will allow you to have Dynamics AX do all of this in the background for you. How to Do It… To do this click on the Prospective Vendor User Requests menu item within the Vendor Requests folder of the Common group within the Procurement and Sourcing area page. This will open a list of users that need to be set up so that the Vendor will be able to log into the Vendor Self Service Portal. You will see that the user that you entered in the Contact Person Details is here waiting to be approved and configured. Double click on the user and your will then see the User Request Details. Notice that there is no option to submit this user for provisioning right now because you have not specified a User Alias. If you enter in a User Alias and then save the record you will be able to submit the user to the User Provisioning Workflow. 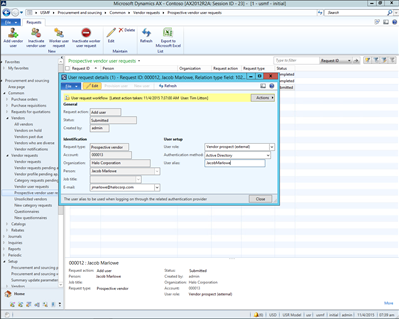 The User Provisioning Workflow This is managed through another workflow that we have set up within Dynamics AX. How to Do It… To view the workflow, click on the User Workflows menu item within the Workflow folder of the Setup group of the System Administration area page. When the User Workflows are displayed, double click on the User Request Workflow record. This will open up the User Request Workflow designer and you will see that we have an automatic step in this workflow that provisions the user – so we don’t even have an approval step. 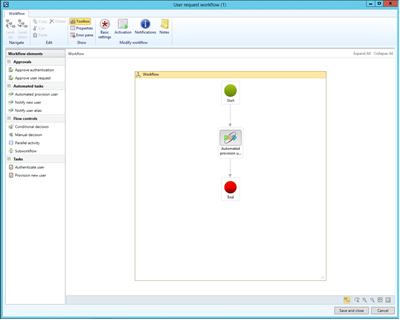 Viewing the User Provisioning Workflow History Just like the other workflow, all of the history of the workflow is tracked and audited just in case you want to see what has been done by each user. How to Do It… To do this click on the Actions button and select the View History button. This will show you all of the workflow steps that have been performed. 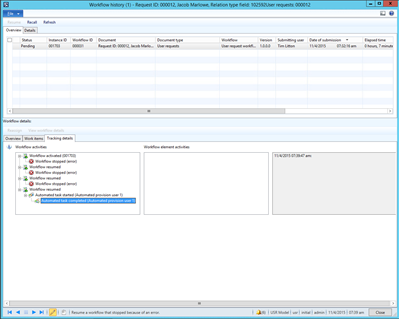 Viewing the newly Provisioned User After the workflow has provisioned the user we can take a look at it within the System Administration area. How to Do It… To view the user, click on the Users menu item within the Users group of the System Administration area page. When the list of users are displayed, filter out the users and find the user that you created the alias for. 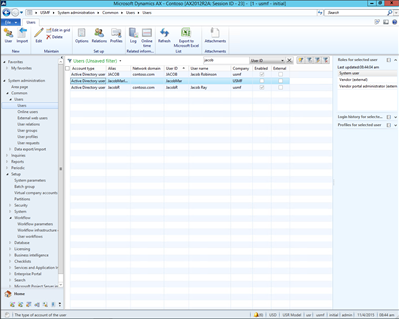 If you click on the Relations button within the Setup group of the Users ribbon bar you will open up the User Relations form and see that the user relation with the vendor account has been created. After you have seen this then just click on the Close button to exit from the form. 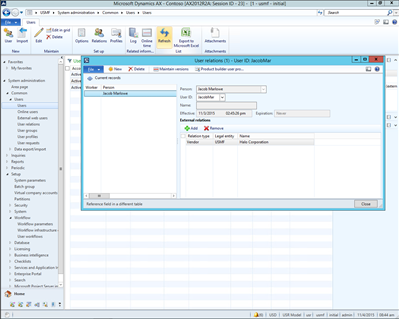 Updating the Prospective Vendor with the Required Codes Once the user has been provisioned we will move onto the next step in the process which is converting the prospective vendor into a real vendor within Dynamics AX. Before we can do that there are a few required fields that need to be added to the template which will then allow us to submit the vendor for review and approval. How to Do It… Click on the Vendor Profile Pending Approval menu item within the Vendor Requests folder of the Common group within the Procurement and Sourcing area page. This will open up the Vencor Profile Pending Approval list page and you will see that your prospective vendor is there. Now that the required configurations are done with the users and the vendor details when you select the vendor you will have the ability to click on the Update Profile button within the Profile group of the Vendor Request ribbon bar. 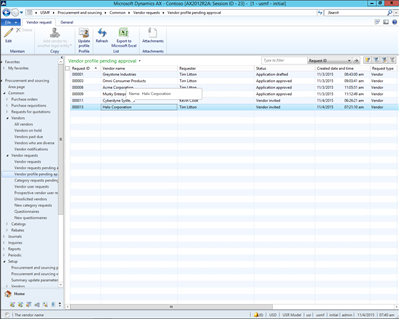 This will open up the Prospective Vendor Profile form. Notice that the workflow bar is not allowing you to submit the prospective vendor for conversion into a vendor yet though because there are some required fields that are missing. Click on the Update Profile button within the Maintain group of the Vendor ribbon bar to enter into edit mode. Click on the Vendor Group dropdown list and select a Vendor Group. 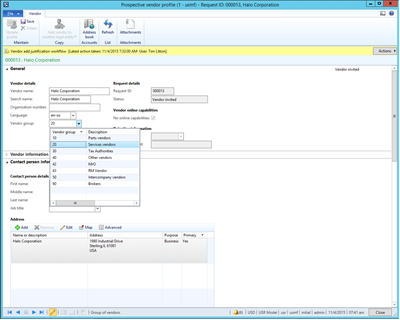 Then expand out the Payment Information tab and you will see that there are some fields that need to be entered in. Click on the Currency dropdown list and select a currency – i.e. USD. 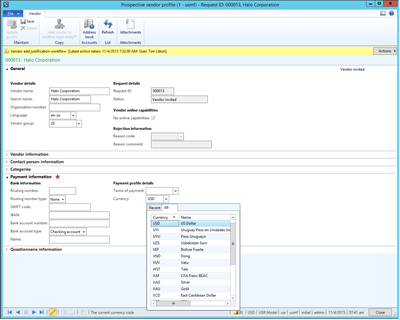 Then just to be tidy, click on the Terms of Payment dropdown list and select a Payment Term code – for example Net30. 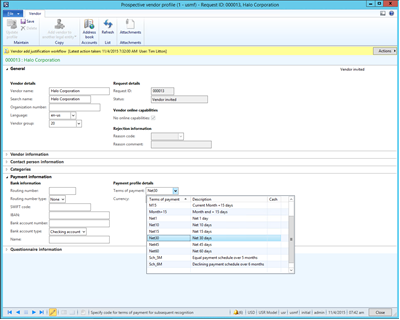 Now that all of the required fields are updated, when you save the record, the workflow bar will allow you to submit the Prospective Vendor for setup through a workflow. The Vendor Add Workflow This workflow can have a number of different steps and approvals associated with it as well. How to Do It… To view the workflow, click on the Procurement and Sourcing Workflows menu item within the Setup group of the Procurement and Sourcing area page. When the Procurement and Sourcing Workflows list page is displayed, double-click on the Vendor Add Justification Workflow item in the list. When the workflow canvas is displayed you will see that in this example we have a two step process where the Vendor is reviewed and then approved and setup. 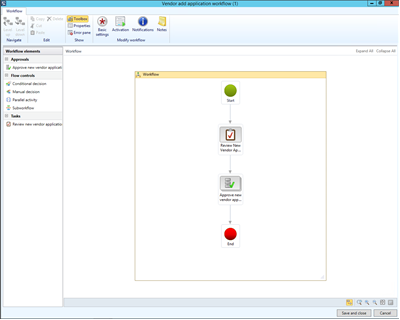 Submitting the Prospective Vendor to the Vendor Add Workflow Once the vendor template is ready we can submit the vendor request to the final workflow which will go through the two stage review and approval process. How to Do It… To do this, just click on the Submit button within the workflow bar. This will open up the comments dialog box for the Vendor Add Application Workflow. If you want to add any comments then type them into the Comments field and then click on the Submit Button. 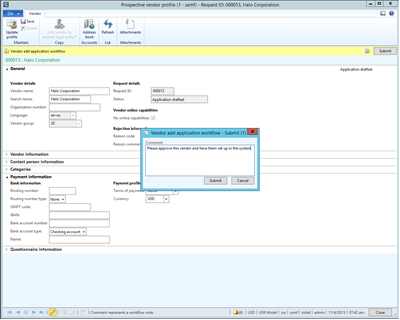 Reviewing the Vendor Add Request The first step in the approval workflow that we will perform is just a review by the Procurement group. How to Do It… To do this open up the Notification List and you will see that you have been assigned a new approval task. Select it and then click on the Go To Origin button within the menu bar.  This will open up the Prospective Vendor Profile showing you the new vendor request. If you want to mark that you have reviewed the vendor request then click on the Actions button in the workflow bar and select the Review New Vendor Application Request button. 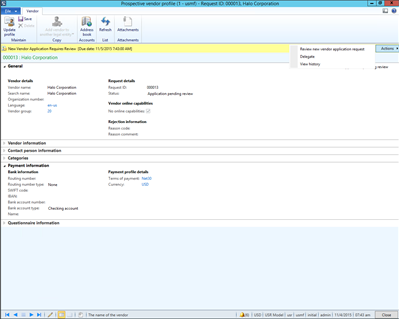 This will open up the comments dialog box for the Vendor Add Application Workflow Review. If you want to add any comments then type them into the Comments field and then click on the Review New Vendor Application Request button. 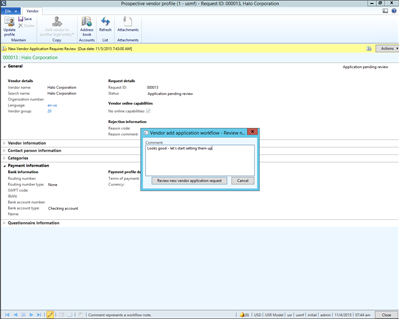 Approving The Prospective Vendor For Conversion To A Vendor After the request has been approved we can now move to the second step in our workflow which is the approval and creation of the vendor record itself. How to Do It… Now that the prospective vendor has been reviewed you can click on the Actions button and you will see that you have different options for approving the vendor. Just click on the Approve button. 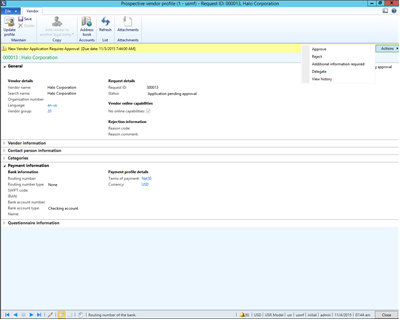 This will open up the comments dialog box for the Vendor Add Application Workflow Approval. If you want to add any comments then type them into the Comments field and then click on the Approve button. 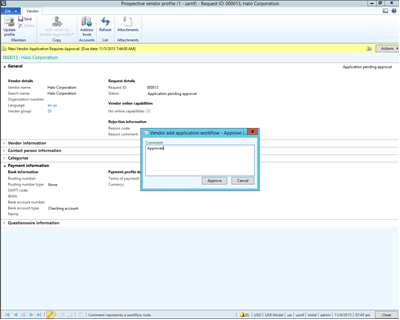 Viewing The Vendor Add Workflow Steps Again, if we want to track the progress of the vendor approval through the workflow history then we can easily do that. How to Do It… To do this click on the Actions button and select the View History button. This will show you all of the workflow steps that have been performed. 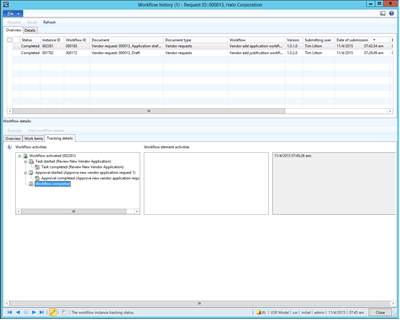 Viewing The New Vendor Record Once the workflow has completed, it will automatically convert the prospective vendor into a real live vendor within Dynamics AX. If you don’t believe us then just take a look. How to Do It… To do this, click on the All Vendors menu button within the Vendors folder of the Common group within the Procurement and Sourcing area page. When the All Vendors list page is displayed then you will see that there is a new vendor record that was created from the New Vendor Request. 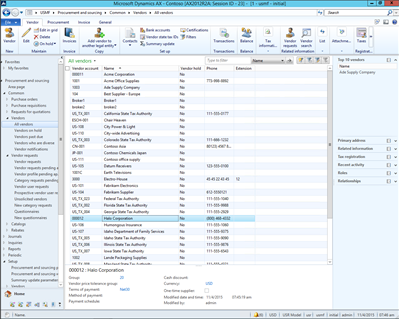 If you open up the Vendor record you will see that all of the information that you configured during the process has been copied to the vendor record. 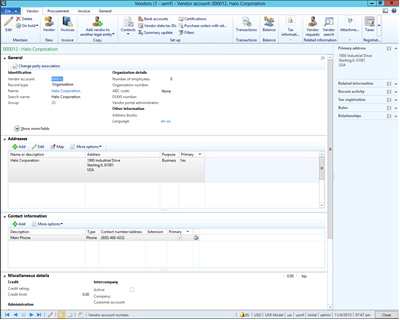 Summary The Vendor Onboarding process is a great way to streamline the new vendor setup process and to also add some control over the vendors. Through the use of workflows you can streamline and also automate a lot of the processes that you may be doing manually. There are additional features that we haven’t talked about in this walkthrough though including the ability for prospective vendors to log into the employee self service portal and update their information themselves before being converted over to a vendor, which creates a tighter relationship with the vendor. You might want to test that out as well.   Источник: http://atinkerersnotebook.com/2015/1...amics-ax-2012/
__________________
Расскажите о новых и интересных блогах по Microsoft Dynamics, напишите личное сообщение администратору. |
|
|
|
|
| Опции темы | Поиск в этой теме |
| Опции просмотра | |
|


 Линейный вид

