 15.12.2016, 22:12
|
#1 |
|
Участник
|
atinkerersnotebook: Creating New Customer Notifications for Dynamics 365 for Operations using Flow and the Common Data Service
Источник: https://atinkerersnotebook.com/2016/...-data-service/
============== There are times where you want to create alerts or notifications triggered off the data within Dynamics 365 for Operations. There are a number of different ways that you can do this, but one of the simplest ways to do this is through Flow which allows you to create simple integration points that trigger other events that you may want to chain off the data. All of this can be done without even having to resort to a single line of code, and also without touching the base Dynamics 365 for Operations functionality. In this walkthrough we will show an example of how you can take advantage of Flow to create a simple email alert that is triggered off the creation of a new customer within the system. Topics Covered
Create a new Entity within the Common Data Service The first thing that we need is an Entity within the Common Data Service that we will use to track the new records within Dynamics 365 for Operations. This will also be the trigger entity that will allow us to chain other flow events to it. We could use some of the standard data entities, but for this example we will create a new and simpler entity that we will use just for this project. How to do it… To do this, open up PowerApps and then click on the Entities link within the Common Data Service so that you are able to see all of the standard Entities. To create a new Entity, click on the New entity button.  This will open up the New entity form. First we need to set the Entity name. For this example we will set it to CustomerAccounts. Then give the new Entity Display name. Here we set it to Customer accounts. Finally we can add a Description to the entity. After we have done that we can click on the Next button to start designing the entity.  Now we will be taken to the New entity form with the list of all the default fields. We will want to add a few more fields here that will be used to track the Operations information within the Common Data Service. To do this, click on the + Add field button.  This will add a new field placeholder for the entity. For the first field we will want to add a field that will hold the customer number from Dynamics 365 for Operations. So we will want to set the Display Name to Customer Number. Then set the Name of the field to CustomerNumber. Finally, click on the Type dropdown list and set the Type to Text.  This field is also the unique index that we will use to link back to Dynamics 365 for Operations, so before we finish with this field check the Unique property so that we will not be able to create duplicate customer account records. Now we will want to add a field that we will use to store the Name of the customer. So click on the + New field button again to create a new field in the entity. For this field, set the Display Name to Name. Then set the Name to Name. And, click on the Type dropdown list and set the Type to Text.  We will want to add one more field to the entity that we will use to store the Customer Group for the customer. So click on the + New field button again to create a new field in the entity. For this final field, set the Display Name to Customer Group Id. Then set the Name to CustomerGroupId. And, click on the Type dropdown list and set the Type to Text.  Now that you have added the key fields, all that is left to do is click on the Create button to add the new Entity to the Common Data Service.  When we return back to the Common Data Service Entities we will be able to scroll down and see our new Customer Accounts entity.  Creating a Flow To Add Operations Customers to the Customer Accounts Entity Now that we have an entity that we can use to track the Dynamics 365 for Operations customers within we will want to start populating it with real data. The easiest way to do this is to create a flow that looks at all of the customers within Operations, and then just adds them to the Common Data Service. How to do it… To do this, click on the Flows link within PowerApps and we will be able to see all of our Flows that we have associated with our database. To create a new flow that will copy the customer information to the Common Data Service, just click on the Create from blank button.  This will open up the Flow Designer form and will ask us for the trigger event that we will use to start off the flow. For this example we will want to create a periodic flow that runs on a timer. So we will want to search through the triggers and select the Recurrence trigger.  When the Recurrence trigger is displayed, we can click on the Frequency dropdown list and see all of the different time scales that we can use to specify the recurrence interval type. In this example we will select the Hour option.  If you want to change the Interval you can, but in this case we will leave it as 1 to run every hour. Next we will want to add some actions whenever the trigger is fired. To do this, click on the + New Step button and we will see that there are a couple of different options. For this step, click on the Add an action option.  This will show us a search box where we can see all of the different actions that we can choose from. If we filter down the selection we will see that there are a number of actions that are associated with Dynamics 365 for Operations. For this example we will want to get all of the customer records, so we will want to select the Get records action.  This will add a new Get records action to the flow. Now we will want to click on the Instance dropdown list and we can select the instance of Dynamics 365 for Operations that we want to use as the source for our customer data.  Then we can click on the Entity name dropdown list and select the Operations Entity that we will want to connect to. For this example, we will select the Customers entity. We will make one small change before we continue on and that is to restrict the data that is being grabbed, and add a filter to the query. To do this we will want to click on the Show advanced options.  This will open a few additional options for the Get records action.  Here we will want to add an ODATA query filter to the Filter Query field. To filter out the customers to those in a certain group, type in: CustomerGroupId eq ’30’ Then click on the Hide advanced options link to collapse the options.  Now that we have an action to get all of our Customer records we will want to add a new action to process them. To do this, click on the New step button and then click on the … More option. Within this dropdown we will be able to select the Add an apply to each step.  This will add a new action which will allow us to set through each record in the returned array. To tell the action what we want to step through put the cursor in the Select an output from previous steps and a field chooser will be displayed and there will be one option called value. This is a container for all of the customer data within each record. If we click on the value container then it will be added into the field. After we have done that we will want to add an action that we can perform on the record. To do this, click on the Add an action link within the Apply to each  When the action search is displayed select the Common Data Service – Create a new record action which will allow us to add new records within the Common Data Service.  This will add the action within the context of the record that we are working on. Click on The database dropdown list and select the default option.  Then click on The entity dropdown list and we will see all of the Common Data Service Entities, including the new Customer Accounts entity that we just added which we can now select.  This will expand out the action and show us all of the key fields that we added to the new entity, and when we put the cursor within any of the fields we will see all of the key fields from the record within Dynamics 365 for Operations. Click on the Customer Number field and then select the CustomerAccount field from the fields.  Then click on the Name field and add the Name field from Operations. Finally click on the Customer Group Id field and add the CustomerGroupId from the field list. Now that we have built the flow we will want to add a Flow name at the top of the flow. Here we set the name to Create a new Customer Account when a new Customer is added to Operations. Then we just want to click on the Create Flow link.  This will save the flow away for us.  Also, you may notice that the flow will automatically kick itself off and you can watch the progress of the flow. After a few seconds, the flow will complete and you should see green check marks on each of the flow steps.  If we expand out the flow then we will be able to see all of the details of the flow processing and also for the Apply to each step we will be able to scroll through each of the records that are being processed.  Scrolling down on the execution view we will see all of the details of the record as well. We can now just click on the Done button to exit from the flow.  Submitting the Flow to the Template Gallery If you want you can make your flow available to the wider audience through the template gallery. All you need to do is submit it. How to do it… To do this, click on the Submit to gallery button. This will open up the submission details with the name of the flow already filled in. All we need to do is add a better description for the flow and then click on the Submit button.  That will submit the flow template to the gallery and we will return back to the flow confirmation screen. If we click on the My flows link in the menu bar then we will be able to see our new flow that we created and see that it’s active.  Viewing the Customer Accounts Entity Data Since the flow ran for the first time, all of the customer records should be available within the Common Data Service entity. If you don’t believe it then just take a look. How it works… To see the data that has been copied over top the Common Data Service entity, open up the Customer Accounts data entity. Then click on the Data link and we will be able to see all of the records that the flow copied over there.  Creating an Email Notification Flow triggered on New Customers Being Added Now that you have the customer records updating your new entity within the Common Data Service we can start triggering events off it every time a new record is created. For this example we will send out an email alert every time a new customer account record is created. How to do it… To do this, return back to the My flows page and click on the Create from blank button again. When the Trigger search is shown, find the Common Data Service – When a record is created trigger which will be fired off every time we add a new record into a Common Data Service Entity.  Click on The database dropdown list and select the default option. And then click on The entity dropdown list and select the Customer Accounts entity that we created.  Now we want to and an action that will send an e-mail when a new record is created. To do this, click on the New step button and then click on the Add an action tile.  When the action search is shown search for the Office 365 Outlook – Send an email action. This will allow us to connect directly to Office 365 and send an e-mail.  When the Send an email action is displayed, we will see that we just have to fill in a couple of fields. Start off by selecting the e-mail account that you want to send the e-mail to. Next we will want to compose the email subject. To do this, click on the Subject field and you will see all of the fields from the Customer Accounts entity are available for us to use as placeholders. Start off by selecting the Name field and add it to the subject. Then add some hardcoded text to make the email subject a little more descriptive. For example: Name has been added as a new Customer Next we will want to craft a message to show in the body of the email. For example: We just wanted to drop you a note to say that Name has been added as a new customer within Operations. Their Customer Number is Customer Number. Today is a good day. Then give your flow a Flow name. In this example we set it to: Send an e-mail notification when a new Customer Account is added After we have done that click on the Create flow button to publish the flow.  If we click on the My flows link in the menu bar then we will be able to see our second flow that we created and see that it’s active. Seeing it in Action Now that we have our new Entity created, a flow that copies the customers over from Dynamics 365 for Operations, and another flow that sends out a notification e-mail, we can take the project for a test drive. How it works… To do this we will open up Dynamics 365 for Operations and open up the Customers form. Then click on the New button in the menu bar to open up the Create customer panel. Set the Customer account, give your new account a Name and also set the Customer Group. Remember to set the Customer Group to the group that we used as the selection filter. Then click on the Save button.  Now we have a new customer within Dynamics 365 for Operations. Now we will want to run the first flow that we created to copy the customer over to the Common Data Service. We can wait for an hour if we like, or we can give the flow a little coaxing along by selecting the flow, clicking on the … at the end of the flow and clicking on the Run now menu item. 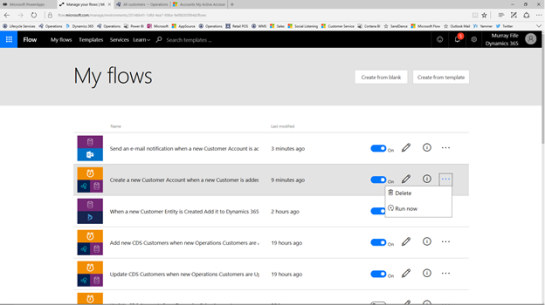 This will force the flow to run on demand.  After the flow completes we will see that there are a few errors. All these are saying is that when the flow tried to add a new record for a record that already exists then it fails – which is fine. If we browse to the last record we will see that the record that we just added to Dynamics 365 for Operations has been added to the Common Data Service Entity.  Also if we return back the flows and click on the information icon on the second flow we will be able to see the execution history, and we should be able to see that it fired a few seconds ago.  If you click on the instance of the flow that just ran you will be able to see that it successfully sent out an e-mail. By expanding out the When a record is created step you will be able to see the record that initiated the flow.  And if you expand out the Send an email action you will see the details for the e-mail.  If you don’t trust that the e-mail was sent you can open up Outlook and the e-mail should be waiting there for you.  Summary In this example we created a very simple integration project that replicates data to the Common Data Service and then triggers events from the new record creation event. This template could be used for a whole slew of other scenarios where changes within the Dynamics 365 for Operations data trigger other events. Emails are just the starting point. Now it’s your turn to start exploring all of the other actions that are available within Flow.   Источник: https://atinkerersnotebook.com/2016/...-data-service/
__________________
Расскажите о новых и интересных блогах по Microsoft Dynamics, напишите личное сообщение администратору. |
|
|


 Линейный вид

