Источник:
https://www.powerobjects.com/2017/12...-dynamics-365/
==============

When viewing a list of cases, each case displays an icon in the left-hand column. Dynamics 365 already has icons in place for Phone, Email, Web, Facebook, and Twitter. The default list provided can be added to, but a default icon is added to each (

). In this blog, we’ll show you how you can customize the icon to your preference.
1. Create your Icon
This must be a 16×16 pixel image ideally a .png file with transparent background.
Tip: Find a suitable image or icon via Google Images (or similar search engine), then convert to /png, remove the background and reduce to 16×16 using an image editor such as icofx3 or similar ensuring the reduced size icon is suitable.
2. Enter the new option into the Case Origin option set (incident_caseorigincode)
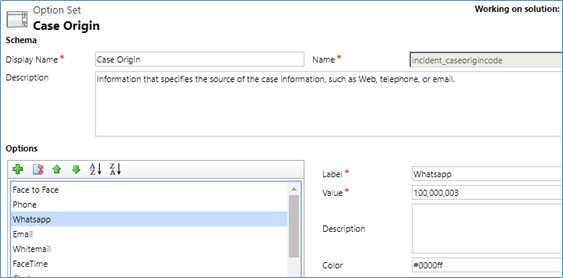
It is essential to note the Value of your new option. In this example, WhatsApp has a value of 100000003.
3. Upload the image as a Web Resource into Dynamics 365.
Name: the name of the Web Resource must adhere to specific rules in order for it to be recognized and applied to the new Case Origin option:
- It must have a prefix of new_, which means it cannot be entered into the solution with any other publisher with another prefix. To do this, upload the image into the default solution, and then subsequently add it into your custom solution if required.
- The name must follow a specific naming convention consisting of 3 parts:
- Part 1 must be the characters “Incident_origincode_icon”
- Part 2 is the Value of the new option, in the example, 100000003
- Part 3 is the file extension of the image, in the example, ‘.png’
 Display Name:
 the display name can be anything.
Tip: use the Display Name when uploading to list all related icons together. Keep the name consistent, for example, begin all icons for the origin options as ‘Case Origin’.
Description: the description can be anything. Make it representative of the icon for future reference.
 Type:
Type: this must be as per the upload image file, for this example, PNG format. JPG format; GIF format; ICO format are also permitted.
Language: this is optional.
Upload File: select the image file to upload and, once uploaded, the ‘URL’ field will be completed, in which you will see the full pathname. The file name must be: new_incident_origincode_icon999999999.ext where 999999999 is the option value and .ext is the image file type.
In the example, this will be
https://mysystem.crm4.dynamics.com//...n100000003.png
Once uploaded and published, the icon alongside the record for the new origin will be the new icon!

Now you know how to your own Custom Case Origin Icons! For more helpful tips and tricks subscribe to our
blog!
Happy Dynamics 365’ing!
Источник:
https://www.powerobjects.com/2017/12...-dynamics-365/